

Dosa Recipe, How to Make Dosa batter
Dosa Recipe, Learn how to make Dosa Batter at home. This detailed post will guide you to make dosas of all kinds – soft, crispy, restaurant style, home style and healthy dosas. No matter you are a beginner or an experienced cook the tips & tricks mentioned in this post will help you master the techniques of making the best South Indian Dosa.
%20-%20Cooking%20Carnival.jpg)
Types of Dosas
What is Dosa?
Dosa is a popular South Indian thin crepe made with fermented rice and lentil batter. History of dosa says that they were made using only rice but with the passage of time, people started to add urad dal / black lentils to give texture and taste.
Dosas became very popular with the rise of udupi restaurants which serve the best dosa varieties – plain, set and masala dosa. Dosa is made by soaking and blending black gram lentils (urad dal) and rice to a batter. Then the fermented batter is spread like a crepe on a hot griddle or tawa.
Is Dosa Healthy?
Yes Dosa is a healthy protein rich breakfast. Urad dal is high in protein & calcium. It makes a great food to start our day.
I consider it to be one of the best health foods that can nourish our body so I try to keep the ratio of urad dal more & rice to minimum or only as needed without compromising the taste and crispness.
Idli and dosas are made regularly at my home for breakfast and sometimes even for dinner. There are so many kinds of dosas one get to find on a tiffin or a fast food center menu.
Dosas can be made with so many different ratios of rice and urad dal. I am sharing 4 recipes here on this post which I follow. You may experiment with any of these dosa recipes to suit your taste or dietary need.
Blender or a Wet Grinder – Which is Better?
I do not use a wet grinder though I have one since I personally do not prefer the cleaning and lifting the stone works. Years ago we used to have frequent guests home from India, So we used to make batter once in a week.
It is a good deal to have and use a wet grinder if you have many people at home to eat idli dosa frequently. For the past 6 years I am happy with my mixer grinder (blender) though we are a family of 4 and make dosas at least 3 times a week.
The batter rises very well even when ground in the mixer if it is a good one and doesn’t make your batter warm while grinding.
However I have shared making batter in a wet grinder and also in a blender. All the ratios shared in this dosa recipe post will work even if making batter in a wet grinder.
Which Kind of Rice is Suitable for Dosa?
There are many kinds of rice available in the market. All the recipes posted here have been tried with raw rice, idli rice and parboiled rice. But you will get the best results with raw rice. Even a combination of the raw rice & parboiled rice gives good results.
The results with parboiled rice are not the same always. It depends mostly on the weather conditions.
Please note that all parboiled rice are not suitable. Only short grain like ponni or sona masuri have worked out well for me.
So overall you need to experiment to see which rice works well for you.
When to Add Salt?
When to add salt to dosa batter? while grinding, before fermenting or after fermenting is one of the most common question.
This you will have to experiment and check what works good for you. Since this depends on the climatic conditions and the water used to blend the batter.
In cool places or cold countries, batter takes long hours to ferment without the addition of non-iodized salt. When kept for long hours the batter may turn smelly.
So to avoid the smell it is good to add a non-iodized salt like rock salt or sea salt before fermentation. These salts assist in quick fermentation.
But in hot places and hot season, it is good to add salt just before making the dosas i.e after fermentation else the batter turns sour and smelly.
In India most people add salt after fermentation unless living in cool places like Bangalore. Taste wise yes there is a difference in adding before and after. So please experiment what works good for you.
Avoid iodized salt by all means if you are adding it before fermentation as it prevents the batter from fermenting.
Recipe 1 – Crispy Dosa Recipe
This recipe yields one of the best tasting brown & crispy dosa. This batter can be used to make masala dosa, crispy plain dosas, uttapam, masala paniyaram and sweet paniyaram. I follow this recipe the most for my regular breakfast.
The masala dosa shown in the first pic is made using this recipe. It can be served with any Chutney, potato masala or Tiffin sambar.
Typically most proportions yield red to brown color dosa only when made on cast iron tawa, but this dosa recipe yields brown crispy dosas even when made on non-stick.
How To Make Dosa Batter (Stepwise Photos)
Soaking lentils & rice
Recipe 1
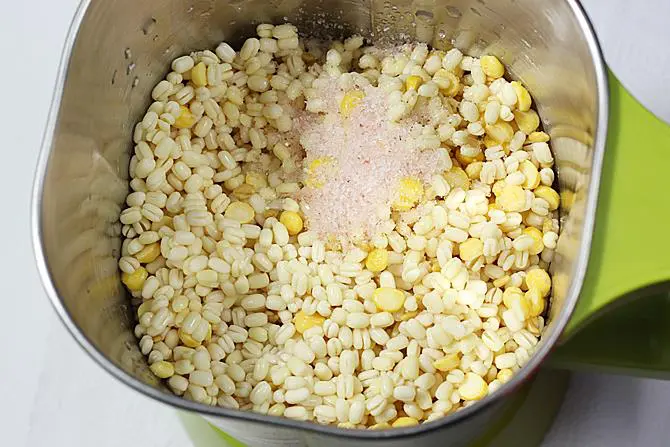
1. Add ½ cup urad dal (skinned black whole lentils), 2 tablespoon chana dal (bengal gram) and ½ teaspoon methi seeds to a large pot.
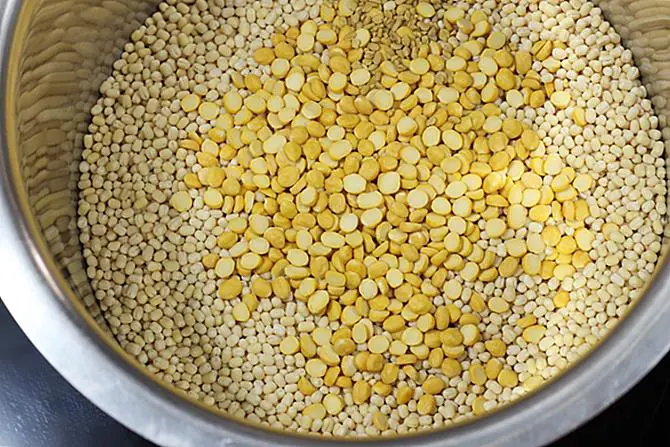
2. Add 1½ cups rice to another pot.
3. Rinse dals thoroughly a few times and soak in lots of water for 4 hours. During cold weather they can be soaked up to 6 hours or even overnight.
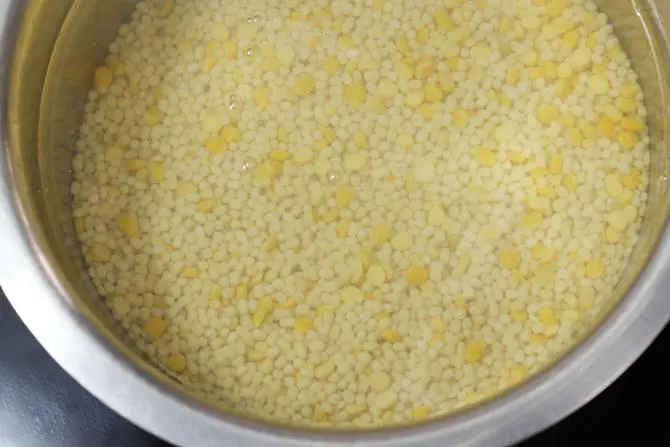
4. Rinse rice too a few times until the water runs clear. Soak in enough water for 4 hours. Same here as well, during cold weather they can be soaked up to 6 hours or even overnight.
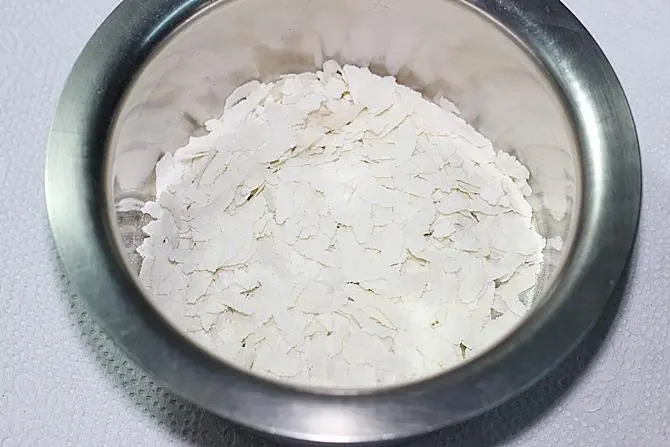
5. 30 mins before blending the batter, rinse and soak 2 tablespoons poha with ¼ cup water for 30 mins.
Making batter
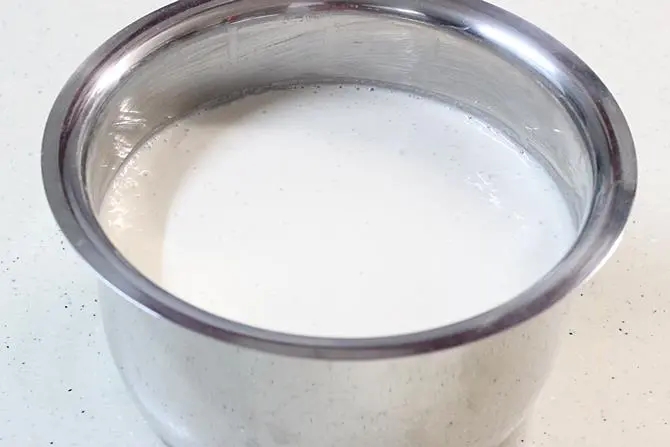
6. Add soaked poha to the grinder jar or container first. Drain the water completely from dals and add them along with ½ teaspoon non-iodized salt and ¾ cup water.
You can also try skipping salt during summer, add it the next morning when you are about to make dosas. It will still ferment well without salt. I use salt when I grind the dal otherwise my batter doesn’t ferment well.
7. Blend until smooth, frothy and bubbly. If needed add more water. I add another 2 to 4 tablespoons water. But do not make it thin or runny. It must be a thick batter yet of pouring consistency. (Check video for consistency)
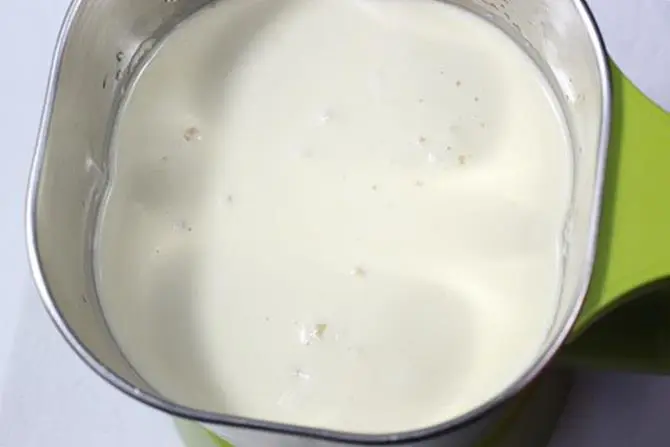
8. Transfer the batter to a a large pot or bowl. Drain rice completely and add to the blender jar. Pour ½ cup water. I use another 2 tbsps more.
9. Blend to a smooth batter.
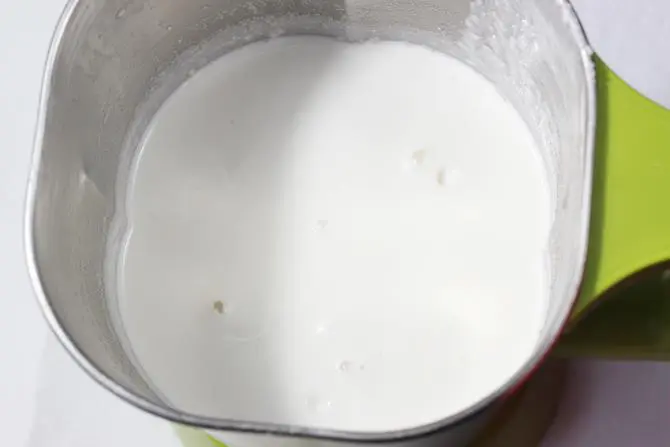
10. Add the rice batter to the urad dal batter. Mix both of them well with your hand. The warmth in the hand is said to help in fermentation. The prepared batter must be of pouring consistency yet thick and not runny.
If it is too thick you may pour some water at this stage and mix. Thick batter won’t ferment well. If it is slightly runny, it is still fine. (check video for consistency)
When I double the recipe, I use 2 glass or ceramic pot to ferment and refrigerate the dosa batter. I divide and distribute the batter to 2 pots. Undisturbed batter stays good in refrigerator for longer without going sour.
How to ferment dosa batter
11. Cover the pot and ferment it in a warm place until the batter rises and turns bubbly. If you live in a warm region, then you can just keep it on the counter overnight. It may take anywhere from 5 to 16 hours depending on the temperature.
To ferment in colder regions, preheat the oven at the lowest setting (140 F or 60 C) for 10 mins. Turn off the oven and keep the dosa batter inside with the oven light ON. You can also use your instant pot to ferment with the yogurt settings. Use an external lid and not the IP lid. I ferment for only 7 to 8 hours in the oven & IP.
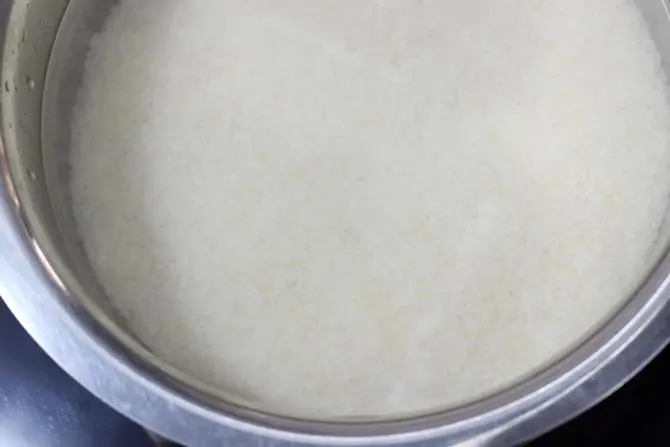
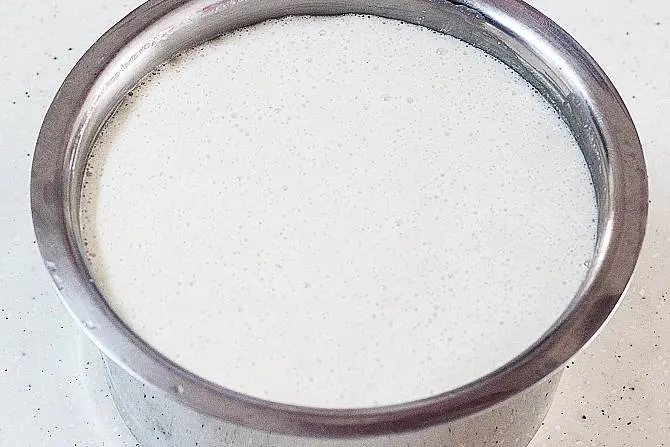
12. When I made this, I had to ferment for 16 hours in a closed kitchen cabinet. When properly fermented, the batter raises and turns light, fluffy with lots of pores & bubbles. The batter was half of the bowl before fermentation. It rose a little over ¾ of the same bowl.
Fermentation test: To check, drop half a spoon of this batter into a bowl filled with water. Well fermented batter will float & not sink.
13.This is a closeup shot of how the batter looks after fermentation. For a good fermentation 4 things matter the most – quality of dal, non iodized salt, temperature and the consistency of the batter. You can find more tips & tricks for fermentation on the soft idli post which I shared earlier.

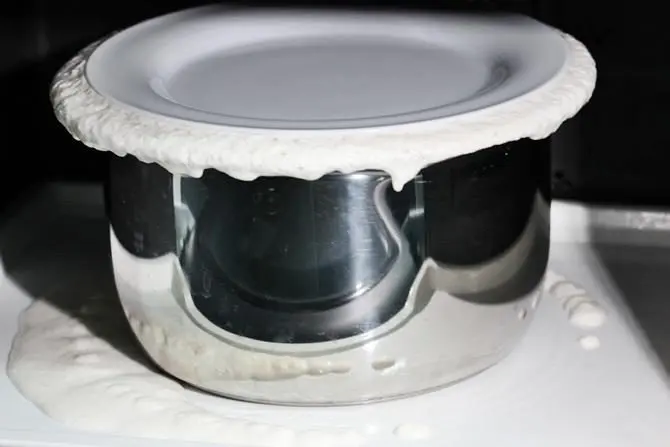
14. Do not over ferment the dosa batter as it turns sour and the batter is not so good to spread on the griddle. This is a picture of over fermented batter just for your reference.
15. Once your dosa batter is well fermented, keep it in the refrigerator.
How to make dosa
16. The batter will be thick after fermentation. Transfer the required portion to a mixing bowl. Pour little water as needed to make it of a pourable and spreading consistency. (please check video for consistency).
17. Add few drops of oil to a griddle or pan. Rub well with a kitchen tissue or cloth until the oil is absorbed. Make sure there is no excess oil on the pan. You can also use a slice of onion to rub the oil.
18. Heat the pan on a medium high heat. You can sprinkle few drops of water and check if it is hot and ready. It will sizzle immediately. Do not sprinkle water often on a hot non stick tawa that’s going to wear out even the best non stick coating.
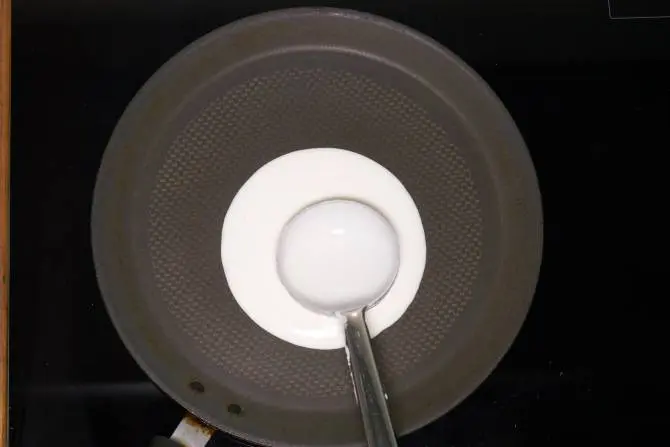
19. When the pan is hot enough, regulate the heat to medium. Stir the batter in the bowl and pour a ladle full of batter in the center of the pan.
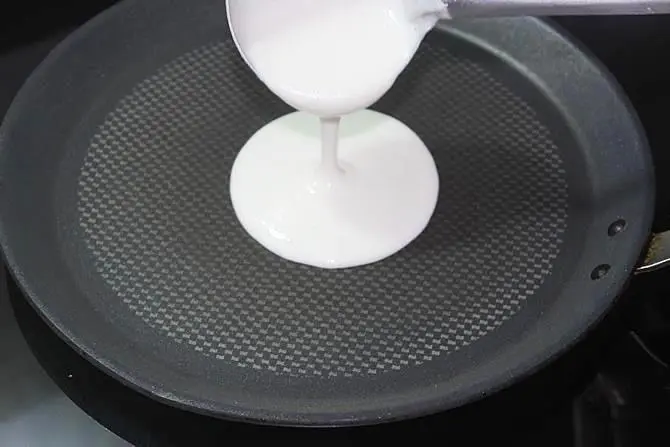
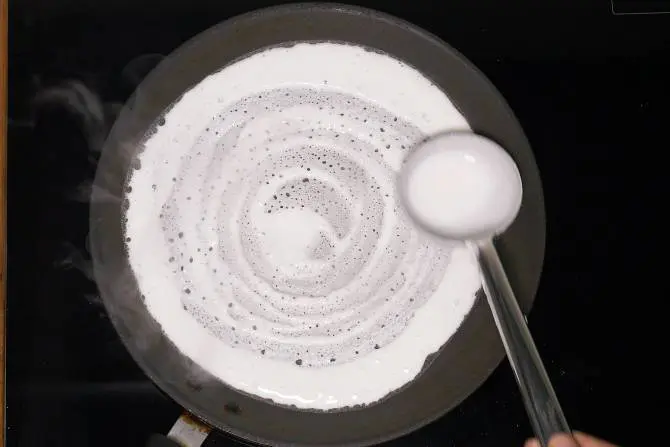
20. Immediately begin to spread it evenly starting from the center in a circular way in clockwise direction to make a thin crepe.
Troubleshooting tip: If you are unable to spread the batter because it got stuck on the pan, this means either the pan is too hot or the batter is too thick. Reduce the flame and cool down the pan slightly. If that doesn’t work then pour little more water to your batter to bring to right consistency.
21. Keep spreading it from the center making circles till you reach the edges.
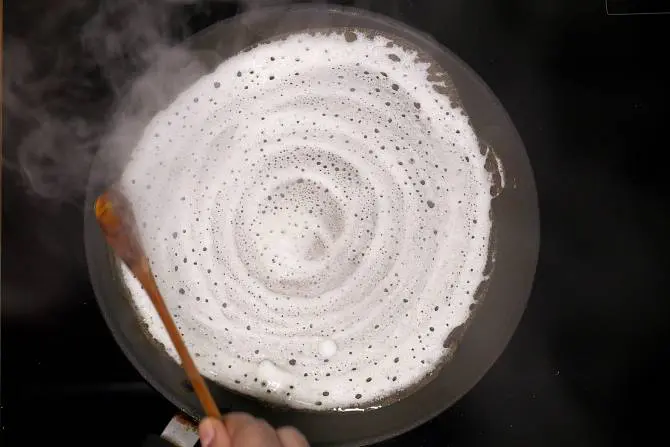
22. Regulate the heat to slightly high and let it cook for a minute then add oil or butter towards the edges. The edges of the dosa will begin to leave/ come off the pan when done.
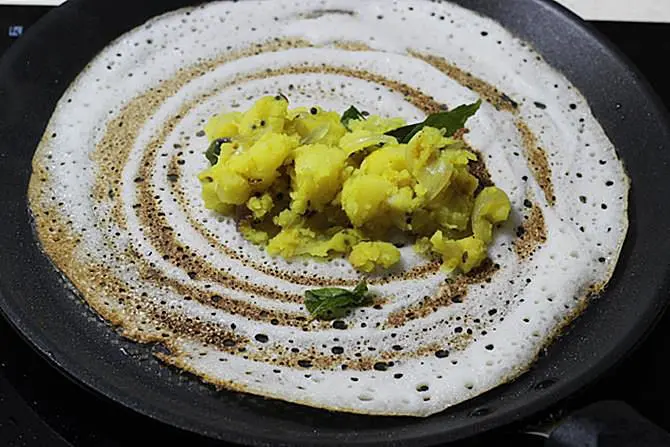
23. When it turns golden or brown on the base, flip it and cook if you like. Not all dosas require cooking on the other side, if needed you can cook. Since I made the masala dosa, I used this potato masala for filling. Plain dosa is most commonly served with coconut chutney.
Serve the dosa right away when it is hot. They begin to soften as they cool down.
Recipe 2
Soft idli & crispy dosa (2-in-1 batter)
These ratios yield good crispy as well as soft dosas and can be used to make soft idlis as well. Just mixing the batter matters. A runny batter yields soft dosas. Making with moderately thick batter, but of spreadable consistency yield crispy dosas.
This can also be used to make masala dosa, paniyaram, uttapam and also soft idli. The only difference from the first recipe is the color. These do not turn as red or brown like the other one but will be golden.
If you like to make your idli and dosa batter in one go in the same blender or wet grinder, then this may be for you.
Ingredients
½ cup whole skinned urad dal
1 ½ cups rice for blender – 2 cups for wet grinder
½ tsp methi seeds
2 tbsp poha (flattened rice) (substitute ¼ tsp methi seeds)
Non iodized Salt as needed
Recipe 3
Restaurant style crispy masala dosa
If you have ever wondered how dosas made in restaurant or tiffin centers turn out so flavorful, crisp and delicious, then you will have to put in little more effort and try this karnataka restaurant style masala dosa. These are very aromatic and unique.
Recipe 4
Sada dosa recipe
This batter can also be used for idli if the quality of urad dal is very good. Aged dal or dal from old harvest won’t work here.
These ratios yield good crispy as well as soft dosas. Just mixing the batter matters here as well. A runny batter yields soft dosas. Making with moderately thick batter, but of spreadable consistency yield crispy dosas.
This can also be used to make idli, paniyaram, uttapam. This dosa batter recipe needs just 3 ingredients
Ingredients
½ cup whole urad dhal
1 ½ cup rice
Non-iodized or crystal salt as needed
Recipe 5
Healthy plain dosa recipe
Healthy, high protein and high calcium dosa. These are made in most telugu speaking homes. Great food for all, including folks recovering from illness, kids and babies above 9 months and even for under nourished.
I make this sometimes when the hubby asks for it since he loves the flavor.These have a unique flavor & taste of urad dal. If you like it, you may not look for any other recipe.
They must be served right out of the pan as they turn lightly crisp, not as crisp as the other recipes I have shared in this post.
I highly recommend this, if you have babies & kids at home (especially underweight kids). Also good for those looking for high calcium foods and even for breastfeeding mothers.
Ingredients
Half cup whole urad dal
1 cup rice
INGREDIENTS (US CUP = 240ML )
Recipe 1 – Ingredients for crispy dosa
- ½ cup urad dal (or whole skinned black gram)
- ¾ to 1 cup water (to blend dal)
- 1½ cups rice (regular raw rice or basmati rice, Refer notes)
- ½ cup water (to blend rice, may need 2 tbsps more)
- 2 tablespoon chana dal (bengal gram)
- ½ teaspoon fenugreek seeds (methi seeds) (optional)
- 2 tablespoon poha (flattened rice)
- ½ teaspoon rock salt (or non iodized salt or crystal salt)
Recipe 2 – Idli & dosa batter (2-in-1)
- ½ cup whole urad dal (skinned whole black gram)
- ¾ to 1 cup water (to blend dal)
- 1½ cup rice (regular raw rice or basmati rice, refer notes)
- ½ cup water (to blend rice, may need 2 tbsps more)
- ½ teaspoon methi seeds (fenugreek seeds) (makes dosas golden)
- 2 tablespoons poha (flattened rice, or substitute ¼ teaspoon methi seeds)
- ½ teaspoon rock salt (or non iodized salt or crystal salt)
INSTRUCTIONS
Preparation
- Firstly add urad dal, chana dal & methi seeds to a large bowl. Rinse them very well several times and discard the water. Soak them together in enough fresh water for 4 to 5 hours.
- Next add rice to another bowl and rinse a few times. Pour fresh water and soak in ample water for 4 to 5 hours.
How to Make Dosa Batter
- Soak poha in ¼ cup water 30 mins before blending the batter.
- Drain the water from the dal & methi. Add them to a blender jar along with salt, soaked poha and ¾ cup water. You can also skip salt at this stage if you live in a hot region. Add it to the batter just before you make dosas.
- Grind to a smooth batter until smooth & bubbly or frothy. If needed add more water about 2 to 4 tbsps. It will be of thick pouring consistency and not very runny. Transfer this to a large pot.
- Drain the water completely from rice & add it to the jar. Then pour ½ cup water.
- Blend to a smooth or slightly coarse batter. It will be of thick pouring consistency and not very runny.
- Pour this to the urad dal batter and mix well both of them well with your clean hand. Warmth in the hand will help in fermentation. The consistency should not be too thick & too runny otherwise the batter will not ferment. (Check video to understand the consistency)
Fermenting Dosa Batter
- Cover the pot and ferment it in a warm place until the batter rises and turns bubbly. If you live in a warm region, then you can just keep it on the counter overnight. It may take anywhere from 5 to 16 hours depending on the temperature.
- To ferment in colder regions, preheat the oven at the lowest setting (140 F or 60 C) for 10 mins. Turn off the oven and keep the dosa batter inside with the oven light ON. You can also use your instant pot to ferment with the yogurt settings. Use an external lid and not the IP lid. I ferment for only 7 to 8 hours in the oven & IP.
- Check if properly fermented: Well fermented dosa batter will rise & increase in volume. It will be frothy and bubbly. To check, drop half a spoon of this batter into a bowl filled with water. Well fermented batter will float & not sink.
- Stir the dosa batter once. Transfer a portion of this to another small bowl to make dosas. Refrigerate the rest for up to 1 to 2 weeks.
- The fermented batter usually becomes thick, so add little water good enough to thin it down. At this stage it has to be of a pouring consistency yet thick. (check video)
- If making masala dosa, you will have to make this potato masala or any chutney from here.
How to Make Dosa
- Grease a dosa pan or tawa with few drops of oil. You can also rub the oil with a slice of onion. This prevents the dosas from sticking to the pan.
- Heat it until hot enough. To check you can sprinkle little water over then pan. If it is ready it will sizzle.
- Stir the batter well in the bowl. Take a ladle full of dosa batter & pour on the center of the hot griddle/ tawa.
- Immediately begin to spread it evenly starting from the center in a circular motion in clockwise direction to make a thin crepe.
- Increase the heat to slightly high and let it cook for a minute then add oil or butter towards the edges.
- The edges of the dosa will begin to leave/ come off the pan when done. Continue to toast until the dosa turns golden and crisp.
- Not all dosas need to be cooked on the other side. Only thicker ones need. If you wish to cook on the other side, flip it when the edges begin to rise from the pan. Cook on the other side of the dosa. Then flip back and toast until the base becomes crisp & golden.
- Before making the next dosa, reduce the heat to low. You can also rub with the cut onion and then pour the batter.
- Serve dosa with coconut chutney, potato masala & tiffin sambar.
NOTES
Notes for dosa recipe
- What kind of rice to use?The taste & texture of the dosa depends on the kind of rice used. Here are my latest updates: You can use basmati rice or any short grain regular raw rice like sona masuri or ponni.You can also use 1 cup regular raw rice and ½ cup parboiled rice or idly rice.You can also use ¾ cup raw rice and ¾ cup parboiled rice or idly rice.Experiment with the above proportions and find what works for you the best in terms of taste and texture.
- I have shared troubleshooting tips along with the step-by-step photo instructions. If you are a beginner, you may follow that.
- The actual amount of water needed to make the batter depends on the kind of urad dal and soaking time. If you soak them longer, you will need lesser water.
- To make the batter in wet grinder, Soak the methi seeds separately. First add the soaked methi seeds to the wet grinder container. Begin to grind sprinkling water little by little. After sometime it will become fluffy, thick and frothy. Then add the urad dal and poha blend until fluffy. Followed by rice. If your wet grinder does a very good job, then you can also add dal, rice and poha together.


%20-%20Cooking%20Carnival.jpg)

%20-%20Cooking%20Carnival.jpg&description=Dosa)
0 Comments